Console and printing
A Console
is where output goes. It knows how wide the terminal is, which colours it
supports and which theme to use, and it turns anything
renderable into styled text. Most programs create one
console and print everything through it.
use rich::Console;

fn main() {
    let console = Console::new();
    console.print_str("[bold magenta]Hello[/], world");
}
The examples on this page use these imports:
use rich::measure::Measurement;
use rich::{
    ColorSystem, Console, ConsoleOptions, Justify, Overflow, Panel, Renderable, Rule, Segment,
    Style, Text,
};
Printing
| Method | Takes | Use it for |
|---|---|---|
print_str(&str) |
console markup | Strings: parses [tags], expands :emoji:, applies highlighting |
try_print_str(&str) |
console markup | The same, but returns an error for malformed markup instead of printing it raw |
print(&dyn Renderable) |
any renderable | Text, Table, Panel, your own types |
print_justified(&str, Justify) |
console markup | A line aligned left, centre, right or fully justified |
print_with(&dyn Renderable, &ConsoleOptions) |
any renderable | Overriding width, justify, overflow or wrapping for one print |
Every print ends with a newline.
fn printing(console: &Console) {
    // Markup: parsed, emoji-expanded and highlighted.
    console.print_str("[bold magenta]Hello[/], [italic]world[/] :wave:");
    // Automatic highlighting of numbers, strings, paths, URLs…
    console.print_str("Loaded 3 files from /etc/app in 250 ms");

    // Any Renderable goes through `print`.
    console.print(&Text::styled("A styled Text value", "bold green"));
    console.print(&Rule::new("[b]a rule[/]"));

    // A blank line is an empty print.
    console.print_str("");
    console.print_justified("[reverse] centred [/]", Justify::Center);
    console.print_justified("right →", Justify::Right);
}
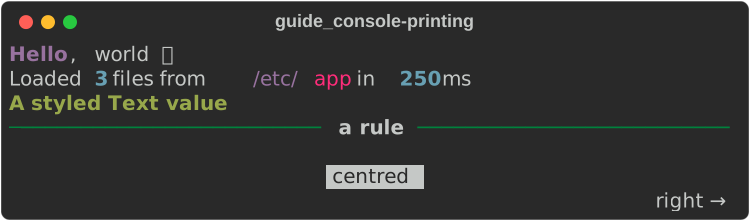
Upstream's console.rule() and console.line() are spelled as plain prints
here: console.print(&Rule::new("title")) and console.print_str("").
Upstream's console.log() has no method on the console; print a
LogRecord instead.
Escape text you did not write
print_str parses markup, so user-supplied text containing [ can change
your formatting. Pass it through rich::markup::escape first, or build a
Text::new(untrusted) and print that — Text::new never parses markup.
See markup.
Per-print options
print_with takes a
ConsoleOptions.
Start from console.options() and change the fields you need: max_width,
height, justify, overflow, no_wrap.
fn print_with(console: &Console) {
    let long = "Pneumonoultramicroscopicsilicovolcanoconiosis-is-a-very-long-word";

    let mut options = console.options();
    options.max_width = 30; // render into 30 cells
    options.overflow = Some(Overflow::Ellipsis);
    options.no_wrap = Some(true);
    console.print_with(&Text::new(long), &options);

    options.overflow = Some(Overflow::Fold);
    options.no_wrap = None;
    console.print_with(&Text::new(long), &options);
}

A printed Text uses the print's options
When a Text is printed directly, its own justify, overflow and
no_wrap are dropped in favour of the print's options — upstream does the
same. Set them through print_with, or put the Text inside a container
(a Panel, a table cell), where its own settings apply.
Configuring the console
Console::new() detects everything. Console::builder() lets you override it:
fn builder() {
    let console = Console::builder()
        .width(72) // ignore the detected width
        .height(20) // ignore the detected height
        .force_terminal(true) // style even when stdout is not a TTY
        .color_system(Some(ColorSystem::EightBit)) // downgrade colours to 256
        .no_color(false) // true: plain output, no colour or other styling
        .highlight(true) // automatic repr highlighting (the default)
        .emoji(true) // expand :shortcodes: (the default)
        .build();

    assert_eq!(console.width(), 72);
    assert_eq!(console.color_system(), Some(ColorSystem::EightBit));
    assert!(console.is_terminal());
}
| Builder method | Default | Effect |
|---|---|---|
width(usize) |
COLUMNS, else the terminal width, else 80 |
The width everything is rendered into |
height(usize) |
LINES, else the terminal height, else 25 |
Used by height-filling renderables such as Layout |
color_system(Option<ColorSystem>) |
detected from COLORTERM/TERM; None when not a terminal |
Standard (16), EightBit (256), Truecolor, or None for no colour at all |
force_terminal(bool) |
detected | Treat stdout as a terminal: keep styles and control codes when piped |
no_color(bool) |
on when NO_COLOR is set and non-empty |
Remove colours from output, keeping bold, italic and underline (see the note below) |
highlight(bool) |
true |
Automatic highlighting of numbers, strings, paths, URLs… |
emoji(bool) |
true |
Expand :rocket:-style shortcodes in markup |
theme(Theme) |
Theme::default_theme() |
The style names markup and renderables look up (themes) |
legacy_windows(bool), safe_box(bool) |
false, true |
On a legacy Windows console, swap ROUNDED/HEAVY boxes for SQUARE |
ascii_only(bool) |
false |
Draw every box with ASCII characters |
Read the result back with console.width(), height(), color_system(),
is_terminal() and no_color().
no_color removes only colour
As upstream's does, no_color strips colours when output is written and
keeps bold, italic and underline. color_system() still reports the
detected colour system, so to ask "will colour reach the terminal?", also
check no_color(). Exports read the recording, so they keep their
colours. For no styling at all, use color_system(None).
Pin the console in tests
Output depends on the terminal. For snapshot tests and generated docs, set
width, force_terminal(true) and color_system(...) so the same code
produces the same bytes everywhere. Every screenshot in this guide is made
that way (how).
Upstream's Console(record=True) has no builder flag here: recording is
scoped to a closure instead — see capturing.
Capturing output
Instead of printing, you can capture what would be printed. Each method runs a closure that receives the same console; everything the closure prints is collected rather than written, and captures nest.
fn capturing() {
    let console = Console::builder()
        .width(40)
        .force_terminal(true)
        .color_system(Some(ColorSystem::Standard))
        .build();

    // Everything printed inside the closure is returned instead of written.
    let ansi = console.capture(|c| c.print_str("[bold]hi[/]"));
    assert_eq!(ansi, "\x1b[1mhi\x1b[0m\n");

    // The same, with styles stripped.
    let plain = console.export_text(|c| c.print_str("[bold]hi[/]"));
    assert_eq!(plain, "hi\n");

    // Render one value without printing it.
    let rule = Rule::new("x");
    let with_newline = console.render_export(&rule); // exactly what print writes
    let without = console.render_to_string(&rule); // no trailing newline
    assert_eq!(with_newline, format!("{without}\n"));

    // The raw segments, for producing several outputs from one render.
    let segments: Vec<Segment> = console.record_output(|c| c.print_str("[red]a[/] b"));
    assert_eq!(segments[0].text, "a");
    assert_eq!(
        console.segments_to_string(&segments),
        "\x1b[31ma\x1b[0m b\n"
    );
}
| Method | Returns |
|---|---|
capture(f) |
the ANSI string f would have written |
export_text(f) |
the same, styles stripped |
record_output(f) |
the raw Vec<Segment>, to render into several formats from one pass |
render_to_string(&r) |
one renderable as ANSI, without the trailing newline |
render_export(&r) |
one renderable exactly as print writes it, newline included |
render_str_to_string(&str) |
one markup string, as print_str would render it |
export_html(f), export_svg(…) |
documents — see Exporting |
build_text(&str) gives you the styled Text that print_str would print, so
you can wrap markup in another renderable.
Measuring
A Measurement
is the minimum and maximum number of cells a renderable needs. Containers use
it to lay out their children; you rarely need it directly, but it explains a
lot of layout behaviour.
fn measure(console: &Console) {
    let options = console.options();
    let text = Text::new("the quick brown fox");
    let m = Measurement::get(console, &options, &text);
    // minimum = the longest word, maximum = the whole line.
    console.print_str(&format!("Text:  min={} max={}", m.minimum, m.maximum));

    // A panel measures its content plus border and padding, as upstream's
    // does, though it still expands to fill the width when rendered.
    let panel = Panel::new(Box::new(Text::new("hi")));
    let m = Measurement::get(console, &options, &panel);
    console.print_str(&format!("Panel: min={} max={}", m.minimum, m.maximum));

    // Clamp a measurement into bounds.
    let m = Measurement::new(5, 19).clamp(Some(8), Some(12));
    console.print_str(&format!("clamped: min={} max={}", m.minimum, m.maximum));
}

Textmeasures from its content: the minimum is its longest word, the maximum its longest line.Table,Tree,Padding,AlignandConstrainmeasure their content, as upstream's do, so they size to it in a table cell or underAlign.Panelfills the width unless built withPanel::fit(or given awidth); a fitted panel measures its content plus its border and padding.- Everything else —
Columns,Layout, and anyRenderablethat does not overridemeasure— reports the full available width. Wrap it inConstrainto make it narrower. Syntax,Json,Pretty,ProgressBarandStyledmeasure their content.Measurement::getnormalizes and caps a renderable's answer atoptions.max_width;clampandwith_maximumadjust one.
The Renderable trait
Renderable
is the Rust form of upstream's __rich_console__. One method is required:
measure is optional (the default asks for the whole width).
Writing your own renderable
This one draws a dotted leader between a key and a value, filling whatever width it is given — so it works at the top level and inside a panel:
/// A key/value line that pushes its value to the right edge with dots:
/// `name ........ value`. It adapts to whatever width it is given.
struct Leader {
    key: String,
    value: String,
}

impl Renderable for Leader {
    fn rich_render(&self, _console: &Console, options: &ConsoleOptions) -> Vec<Segment> {
        let used = self.key.chars().count() + self.value.chars().count() + 2;
        let dots = options.max_width.saturating_sub(used).max(1);
        vec![
            Segment::new(self.key.clone(), Some(Style::parse("bold").unwrap())),
            Segment::new(" ", None),
            Segment::new(".".repeat(dots), Some(Style::parse("dim").unwrap())),
            Segment::new(" ", None),
            Segment::new(self.value.clone(), Some(Style::parse("cyan").unwrap())),
        ]
    }

    fn measure(&self, _console: &Console, options: &ConsoleOptions) -> Measurement {
        // At least "key . value"; happy to take the whole width.
        let minimum = self.key.chars().count() + self.value.chars().count() + 3;
        Measurement::new(minimum.min(options.max_width), options.max_width)
    }
}

fn custom(console: &Console) {
    let row = |key: &str, value: &str| Leader {
        key: key.into(),
        value: value.into(),
    };
    console.print(&row("version", "0.0.7"));
    console.print(&row("licence", "MIT"));
    // Custom renderables nest inside the built-in containers.
    console.print(&Panel::new(Box::new(row("inside", "a panel"))).title("Leader"));
}
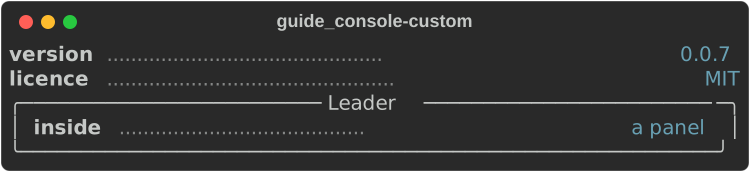
Rules for a well-behaved renderable:
- Stay inside
options.max_width. The console crops lines that run past the terminal edge, but a container gives you less than the full width and expects you to respect it. - Separate lines with newline segments (
Segment::line()), and do not end with one: the console adds the final newline. - Measure honestly if you want to sit in a table column or be centred:
Measurement::new(min, max)with the narrowest and widest you can render. - Reuse the built-ins. Build a
Text,TableorPaneland return itsrich_render(console, options)rather than drawing boxes by hand.
Segments
A Segment
is a piece of text with an optional Style and a control flag (for cursor
movement and other terminal control codes). It is the unit every renderable
produces and every export consumes.
fn segments_demo(console: &Console) {
    let text = Text::from_markup("[bold]Hello[/] world").unwrap();
    for segment in console.record_output(|c| c.print(&text)) {
        println!(
            "{:?} {:?}",
            segment.text,
            segment.style.map(|s| s.definition())
        );
    }
    // "Hello" Some("bold")
    // " world" Some("none")
    // "\n" None
}
Useful helpers on Segment: line(), cell_length(), split_lines,
apply_style, adjust_line_length (pad or crop a line to a width),
simplify (merge neighbours with the same style), crop_lines. For whole
lines at a fixed width, console.render_lines(&r, &options, pad) returns
Vec<Vec<Segment>>, one entry per line — that is what Panel and Layout use
internally.
Gotchas
- Piped output is plain. When stdout is not a terminal,
Console::new()drops colour and control codes. That is usually right (> out.txtgives clean text); useforce_terminal(true)when it is not. - Malformed markup prints raw.
print_str("[/oops]")prints the text as-is rather than failing, which is friendlier than upstream's exception but can hide mistakes. Usetry_print_str/try_build_textfor markup that comes from users or config (divergence #2). - Adding highlighters and themes needs
&mut.add_highlighter,push_themeanduse_themetake&mut self; configure the console before sharing it.
See also
- Text and style — markup, styles, highlighters, themes
- Exporting — HTML, SVG and text output
- Tutorial: your first output
- API:
Console·ConsoleBuilder·Renderable·Segment·Measurement